Hello, dear readers! We have a special treat for you today. We’re stepping aside to let a guest take the reins. We’re thrilled to introduce the aptly named John Carpenter, a passionate DIY enthusiast and skilled woodworker from Portland, Oregon.
John has transformed his love for woodworking into an art form, creating unique and functional pieces for his home. Today, he’s sharing his journey of crafting a stunning coffee table from a 1″ slab of oak.
From the first cut to the final finish, John takes us through each step of the process, sharing his challenges, victories, and invaluable tips along the way. Whether you’re a seasoned woodworker or a beginner looking to dive into a new hobby, John’s story is sure to inspire.
So, without further ado, let’s join John on his woodworking journey. Over to you, John!
Hey there, fellow woodcrafted enthusiast! Today, I’m going to take you on a journey that’s close to my heart. It’s a tale of a 1″ slab of oak, a woodworking workshop, and a dream. So, buckle up and let’s dive into my world of sawdust and shavings.
It all began with a slab of oak. Not just any slab, mind you, but a 1″ thick, rough-cut piece of nature’s finest. It was like a blank canvas, full of potential and waiting for the artist’s touch. I knew from the moment I laid my eyes on it that it was destined for greatness.
The first step was to plan. I sketched, erased, and re-sketched until I had a design that made my heart sing. It was going to be a coffee table, but not just any coffee table. It would be a testament to the beauty of simplicity and the power of craftsmanship.
Next came the cutting. The whir of the saw, the smell of fresh-cut wood, the shower of sawdust – it was a symphony of senses. I cut the slab to size, making sure to follow my design to the letter. Remember, in woodworking, precision is key.
Then, it was time for the shaping. Using a combination of hand tools and power tools, I sculpted the wood, smoothing the rough edges and bringing out the natural beauty of the grain. This is where patience comes into play. Take your time, let the wood guide you, and don’t rush the process.
The final step was the finishing. I chose a clear, natural finish to let the beauty of the oak shine through. Applying the finish was like adding the final brushstroke to a masterpiece. It sealed the wood, protecting it from the elements and giving it a smooth, glossy sheen.
And then, it was done. I stepped back and looked at my creation. From a simple slab of oak, I had created a unique piece of furniture, a piece that was as functional as it was beautiful. The feeling of accomplishment was overwhelming.
Reflecting on my experience
Reflecting on our experiences is how we grow. Here are my five key takeaways from this project:
- Planning is Crucial: Before even touching the wood, having a clear plan in place is essential. This includes detailed sketches, accurate measurements, and a step-by-step process. It saves time and prevents costly mistakes.
- Patience Pays Off: Woodworking is not a race. It’s important to take your time with each step, especially with sanding and finishing. Rushing through these steps can lead to a less than satisfactory result.
- The Right Tools Matter: Investing in good quality tools makes a significant difference. They not only make the job easier but also ensure precision and a better finish.
- Safety is Paramount: No piece of furniture is worth an injury. Always wear safety goggles, work in a well-ventilated area, and be mindful of where your fingers are in relation to power tools.
- Embrace Mistakes: Mistakes are not failures, they’re learning opportunities. Each hiccup is a chance to improve your skills and deepen your understanding of the craft. Don’t be disheartened by them, embrace them.
This project was a journey of discovery and learning, and these takeaways have not only made me a better woodworker but have also enriched my DIY experiences.
So, there you have it, my journey from slab to fab. It was a journey of discovery, of creativity, and of craftsmanship. And I can’t wait to embark on the next one. Until then, keep crafting, keep creating, and most importantly, keep having fun. Happy woodworking!
Mistakes were made!
Ah, the mistakes! They’re the secret sauce to any DIY project, aren’t they? Well, let’s dive into some of the bumps I hit on this woodworking journey.
- Measurements: My first hiccup came with the measurements. In my excitement, I measured once and cut. Big mistake. I ended up with a shorter table leg. The solution? I had to trim the other legs to match. Lesson learned: always measure twice, cut once.
- Sanding: I underestimated the importance of proper sanding. I was eager to move on to the finishing and didn’t sand the table top as thoroughly as I should have. The result was a rough finish that didn’t do justice to the beautiful oak. I had to go back, sand it down properly, and reapply the finish. Patience truly is a virtue in woodworking.
- Finishing: I initially chose a dark stain for the finish, thinking it would give the table a sophisticated look. But it ended up hiding the beautiful grain of the oak. I had to strip the stain and opted for a clear, natural finish instead. The lesson here was to always consider the type of wood and its natural beauty when choosing a finish.
Each mistake was a learning opportunity, a chance to improve my skills and deepen my understanding of the craft. And that’s the beauty of woodworking – it’s a journey of continuous learning and growth. So, don’t be afraid to make mistakes. Embrace them, learn from them, and keep crafting!
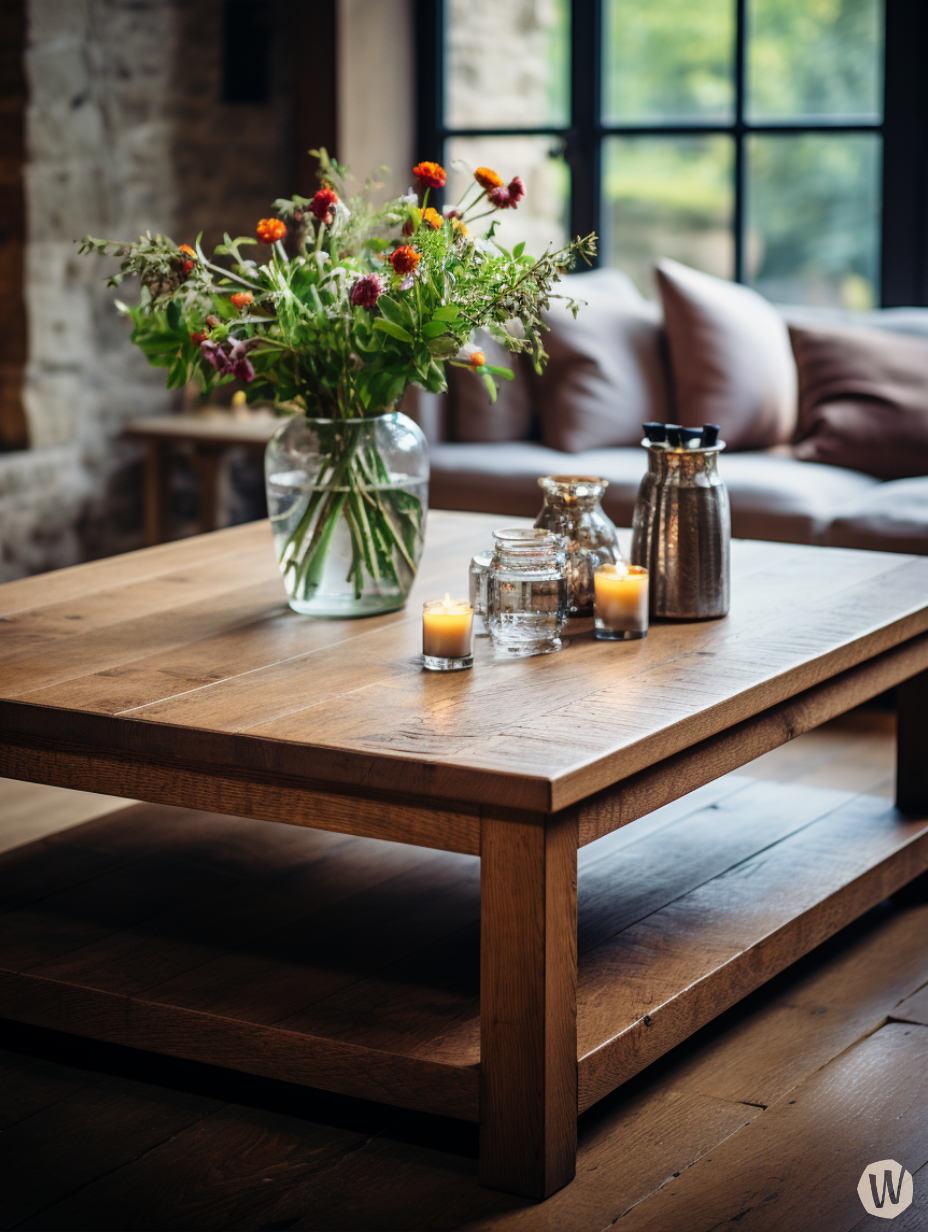
Making the oak coffee table: my process
Here’s how I crafted this table.
The table top was made from eight 1/2″ thick boards. I started by cutting the boards to the desired length, ensuring each cut was precise. Then came the process of joining them. I used a technique called edge gluing, where I applied wood glue to the edges of each board and clamped them together. It’s crucial to apply even pressure with the clamps to ensure a tight bond and a flat surface. Once the glue was dry, I used a planer to smooth the surface and ensure an even thickness across the top.
The lower shelf was a simpler process. I cut a 1″ thick slab of oak to the desired dimensions and sanded it smooth. The thickness of the shelf added a nice contrast to the thinner table top and provided a sturdy space for storage.
The base of the table was the most complex part of the project. I used 2 1/2″ thick oak for the legs to provide stability and a robust look. The interlinking pieces at the top were made from 1/2″ thick oak. I used mortise and tenon joints to connect the pieces. This traditional joinery technique involves cutting a hole (the mortise) in one piece of wood and a matching tenon on the other piece. The tenon fits snugly into the mortise, creating a strong, interlocking joint.
Creating the mortise and tenon joints required careful measurements and precise cuts. I used a combination of a drill press and chisels to create the mortises and a tenon saw for the tenons. Once the joints were cut, I dry-fitted them to ensure a tight fit. Then, I applied wood glue and clamped the joints until the glue was dry.
Once the base was assembled, I attached the table top and the lower shelf using screws. I made sure to pre-drill the holes to prevent the wood from splitting.
The final step was the finishing. I applied a clear, natural finish to enhance the beauty of the oak and protect the wood.
This project was a labor of love, combining traditional woodworking techniques with modern design. It was a journey of discovery and craftsmanship, and the result was a unique piece of furniture that I’m proud to have in my home.
About the author
Name: John Carpenter
Location: Portland, Oregon
Profile:
Hello there, I’m John Carpenter, a passionate DIY enthusiast and woodworker hailing from the beautiful city of Portland, Oregon. My journey into the world of woodworking began quite unexpectedly.
Growing up, I was always fascinated by the process of creating something from scratch. This curiosity led me to dabble in various DIY projects, but it wasn’t until I moved into my first home that I discovered the joy of woodworking.
Faced with the task of furnishing my new place, I decided to take a hands-on approach. I started with a simple bookshelf and was instantly hooked. The feeling of transforming a raw piece of wood into a functional piece of furniture was incredibly satisfying.
Since then, woodworking has become more than just a hobby for me. It’s a form of expression, a way to unwind, and a journey of continuous learning. I’m excited to share my experiences and passion with fellow DIY enthusiasts and inspire others to embark on their own woodworking journey.